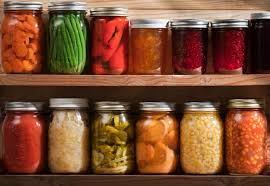
Simple Summer Pleasure: Yogurt

I am so glad I discovered the trick to making great yogurt at home!!  I find summer heat can upset my digestion and a cool bowl of home-made yogurt with fresh fruit or agave sweetener, or a smoothie made with yogurt, fresh fruit and avocado really hit the spot.  If you have not tried my recipe, you are missing out.  Commercially made yogurt is expense and creates individual packaging that needs to be disposed of.

Make Yogurt at Home

Heat one-half gallon of milk to 180 degrees over medium heat.  It makes no difference between skim, 2% or whole milk; choose what fits your nutritional needs.  Cool to 110-115 degrees and add cultured starter.  Starter can be purchased online through cheese making suppliers like Hoegger Goat Supply, but a trip to the grocery store will get you a plain yogurt cup of your style.  I love the creaminess of Greek yogurt, but any plain culture works (no flavoring or fruit please) .  You need only 3 Tblsp of starter for a half-gallon batch but adding a little more won’t hurt anything.

Mix the starter into the milk until dissolved completely then either pour into a yogurt maker or pour into 5 pint mason jars that have been washed in the dishwasher or boiled to sterilize jars.  Warm oven to 200 degrees F  and place the jars on a tray in the oven.  Turn off heat and do not disturb for 6-8 hours.  Overnight works great at my house and doesn’t interfere with baking needs.  After the yogurt has set up, cover with lid and refrigerate.

Yogurt Uses

Yogurt is great for smoothies, fresh with fruit or granola, frozen into ice cream, substituted for sour cream in any recipe, and can also be drained in cheese cloth to make a cream cheese type spread.  Yogurt also makes a great facial mask for gentle cleaning!

Why don’t you give it a try and let me know your favorite use/ recipe for yogurt!


Posted in activities, bath and body products, DIY, Household, Recipe, Seasonal | Tagged , , , , , , , , , , , , | Leave a comment

Starting Seeds

My greenhouse in the spring!

My greenhouse in the spring!

It’s mid-March in the Midwest and time to start thinking about the garden.  Like most serious gardeners, my husband and I start seeds in my greenhouse giving plants a head start on the growing season.  In January I spent hours paging through seed catalogs selecting delectable vegetable and herb seeds; all the while dreaming of summertime and fresh food.  Today I seeded four varieties of tomatoes, four varieties of sweet peppers, two varieties of hot peppers, cabbage, broccoli, brussels sprouts, cauliflower, leeks, and a variety of herbs.  It should take between 7-21 days for the seeds to germinate.

Trays of seeds sit on heating mats to increase soil temperature and improve germination.

starting seeds

The greenhouse is a great space to retreat when winter just won’t give up.  On a sunny day the temperature inside is so warm you have to take your coat off to remain comfortable.  Just a few weeks from now we will have to open the doors and windows to prevent over-heating.  I think of the greenhouse as a plant nursery.  Within 6-8 weeks the plants will be moved out and into the garden.

How to start seeds….

Starting seeds is not difficult and does not require a great deal of equipment.  Seeds can be started in a sunny window in your house, but because of the number of seeds I start, the greenhouse is the best choice for me.

Equipment

  • sterile potting soil or Jiffy peat pellets
  • seed trays, individual cups, tray-pack containers
  • wooden sticks and sharpie
  • water and large container
  • heating mats (optional)
  • dibble stick (or pencil)

The process…

For most seeds, I use Jiffy peat pellets.  They come in different sizes and are very convenient to use.  Jiffy pellets come dry and compressed into little discs but have a porous skin on the outside.  To use, immerse the pellet in water in a large container, until completely expanded, then remove from water and place in seed trays, flats, etc.   Peat pellets or individual cups encourage root growth, provide a convenient way to transplant seedlings to the garden with no waste, and don’t disturb root systems.   Peat naturally retains water which is important to young seedlings which is why I prefer them to soil mixes.

I use plastic trays to hold plants, but also use what I have on hand.  Cardboard and wooden trays, or low-rise boxes work too.  You will need the container to hold up for several weeks and it will get wet.   Make sure the container allows water to drain and that it did not contain toxic material.

Once pellets are expanded and in trays, a pencil works wonderfully to make a depression in each pot.  This is called dibbling.  Check the planting depth listed on the seed packet and depress the pencil down in the center of the pot.  All that’s left to do is drop a seed in each pellet, squeeze gently to cover seed, then press down gently on the top of the pellet with your hand.  Seeds require good contact with soil in order to germinate so compressing the pellet ensures soil contacts the seed properly.  For seeds with germination rates of less than 90%, I drop two to three seeds per pellet, or if the germination rate is below 75% I suggest putting a pinch of seeds in each pellet.  You can always thin plants to one per pellet after germination. Use a marking stick to name and date the seed type started.  I recommend keeping the seed package because it contains information needed to plant the seedling into the garden.  The packet could also be laminated and used as a row marker in the garden and as a reminder of which varieties you grew.

If you don’t want to invest in peat pellets, you can purchase a wooden mold that shapes newspaper strips into a seed cup.  These are available on the internet or from seed companies.  Paper cups work too; whatever I use, I make sure it will decompose in the earth and enrich the soil in my garden.

With the exception of just a few seed types, I start my seeds in individual pellets/cups so the root system is not damaged when transplanted into the garden.  While some seedlings can be bare-rooted with success, I prefer not to interrupt root growth.  Having said that, I did plant leeks today by broadcasting them into a tray to germinate.  After the seedlings are 2-4 inches tall I will transplant them into pellets or tray packs to grow until planted in the garden.

Jiffy's make easy work of starting seeds.  Make sure to identify seed types and date started.

Jiffy’s make easy work of starting seeds. Make sure to identify seed types and date started.

After seeding, the pellets, trays, cups  need to be watered regularly to maintain soil moisture.  Generally seeds germinate quicker if some humidity is present.  Once seedlings have germinated, water in the morning so the stems and leaves have time to dry before dark because excess humidity and cool temperatures encourage plant diseases.  It is necessary to check plants daily to make sure they are moist and not over-heated.  You can “cook” young plants if soil dries out or it becomes excessively warm.

After the seedlings emerge, sunlight is needed to facilitate growth.

Feeding the plants

Seedlings may be fertilized with your choice of plant food.  There are  many commercial plant foods which ensure proper plant growth when used as recommended.  Remember if using jiffy pellets, plants need to be fertilized regularly because peat does not have adequate nutrients to maintain growth.  Commercial potting soil can be purchased with slow-release fertilizer already in the mix.  However, monitor growth and begin fertilizing if growth slows.

Animal manure can be safely used as fertilizer in the garden but it is important to be aware it may contain pathogens that could be transmitted to humans.   E-coli and salmonella outbreaks occasionally make the news resulting in  public awareness that frightens consumers.  Being an informed and educated gardener removes the fear factor when using animal manure. If you raise animals and would like to use manure instead of purchasing fertilizer, do the research and follow through with recommended management procedures.  Land grant universities such as Purdue University offer  valuable resources through their extension programs.

Fresh manure should only be used on the garden in the fall after harvest, to winter-over and enrich the soil for the next growing season.  During the growing season, manure can be used but must be composted first.  Composting manure (manure needs to reach a temperature of 140 degrees F) reduces the transmission of pathogens by way of heat treatment.  Composted manure may be used as a side-dress, meaning it should not be placed directly on the plant, but tilled into the soil surrounding the base of the plant.  Do not apply directly onto plants.  Root vegetables should be washed thoroughly before being consumed.

An important note

Compost is a wonderful thing for the garden, but do not start seeds in compost!  Seeds need sterile soil / potting mixture in order to discourage disease.  Compost is best used when incorporated into the soil prior to planting.  Also if you make your own compost, make sure the compost has time to cure before using on plants.  If not properly aged, it can burn plants.

Final thoughts

We used heating mats this year, placed underneath the trays to encourage germination.  Thermostats are available for the mats allowing you to set the temperature to match the seed temperature requirements.  I have not used them in the past, and during cool springs, seed germination was delayed, reduced, or prevented.  I will let you know what germination results we get this year….

Magazines frequently recommend using egg shells or egg cartons as containers for starting seeds.  Don’t use them!  They are too small unless you are using goose eggs.  There is not enough room for proper root system development and the plants become top-heavy very quickly.

If you are hesitant about your ability in growing plants, or you think you don’t have enough time, start small.  Get a good resource on gardening or talk with a friend that gardens.  Identify a vegetable or two that you love.  Decide if you will grow them in the ground or in containers.  Take advantage of varieties that carry disease resistance.  Order seeds from a reputable seed dealer or purchase plants from your local greenhouse.

Be Bold, Be Creative… Take a chance and enjoy the Simple Pleasure of eating something you grew!

I grew this tray of spinach in my greenhouse this winter.  I harvested spinach for Thanksgiving, Christmas, and it's ready again. I'll keep it growing until the spinach in the garden is ready.

I grew this tray of spinach in my greenhouse this winter. I harvested spinach for Thanksgiving, Christmas, and it’s ready again. I’ll keep it growing until the spinach in the garden is ready.

Posted in activities, DIY, food preservation, gardening, Life's Simple Pleasures, Seasonal | Tagged , , , , , , , , , , | Leave a comment

Winter can Be Beautiful

Winter evening sunset

This winter evening sunset brought a glow to my heart!


Winter is a tedious time of year for me.  Drab days are common in the Midwest from November until March and frequently include cloud-cover, rain, snow, or all of the above conditions.  It’s no wonder folks suffer depression during this time.


One night in December, I looked out my back door and was met with a radiant color show that delighted my eyes, heart, and spirit!  So glad I was able to capture the glory of the moment to share with others that might be craving some beauty.

Please take a moment to enjoy a snap-shot of my Life’s Simple Pleasure Moment………

Pink glow sunset

Pink glow sunset.

And Evening gently descends............

Posted in Health, Life's Simple Pleasures, motivation, Seasonal, Uncategorized | Tagged , , , , , , , , , | Leave a comment

Bring in the New Year by Stretching your Creativity!

Opportunities await!

Opportunities await!

The beginning of a New Year always finds me reflecting on the past year, as well as, looking forward to the possibilities of the New Year.  I spent the last few days considering what I want to accomplish this year.  Some goals are a given….make enough money to keep my home, cover expenses & bills, and have a bit left over for taxes.  As necessary as these things are, I have another pressing need.  I need to stretch and feed my creativity.  I am not alone in this need.  We all need to create in some fashion in order to maintain a zeal for living.  Those that prioritize being creative to the bottom of the “To Do” list, soon find themselves lost in gloom, drudgery, and acute unhappiness.

Being creative could be as simple as reading a new book, going to a new movie, or visiting a museum.  There are those of us that are a bit more hands-on and need to experience creativity in a kinesthetic fashion; we need to touch, see, smell, hear, and yes taste.  We don’t necessarily need to experience all these senses during each creative experiment, but in general we need to experience all of them on a regular basis to stretch our creativity.  I love to make things I never have before or try things I have not done.  Not all of my experiments are 100 percent successful attempts but the act of the experience always is!

This year I am going to make a list of 12 things I want to make or attempt, one per month.  I added making ravioli to my list because while I make egg noodles frequently, I have not attempted ravioli and I love to eat it.  Not sure what else will find itself on the list just yet but the month is still young. I start many seeds in my greenhouse each year to transplant to the garden and yard, and this year, I might try a new seed variety that catches my eye.  I might try my hand at learning to knit, or renew my commitment to learning the guitar, or finishing my first ebook.  I might read a book a month, or commit to socializing once a month.  The choices are limitless; as limitless as my creativity allows.

Why don’t you place stretching your creativity to the top of the priority list this year and designate your own set of adventures on paper.  Don’t just write them down; do them one by one and see where you are next year at this time.  My guess is next year’s list will write itself;  having experienced the joy and accomplishment of simple pleasures this year.

Posted in activities, creativity, DIY, Life's Simple Pleasures, motivation, Uncategorized | Tagged , , , , , , , , , | Leave a comment

2012 in review

The WordPress.com stats helper monkeys prepared a 2012 annual report for this blog.

Here’s an excerpt:

4,329 films were submitted to the 2012 Cannes Film Festival. This blog had 15,000 views in 2012. If each view were a film, this blog would power 3 Film Festivals

Click here to see the complete report.

Posted in Uncategorized | Leave a comment

Reliable Home-made Yogurt!


Amazing Home Made yogurt!

This yogurt is creamy and thick and compares to any store bought yogurt I have ever tried. It is very economical and easy to make.

I own two Salton yogurt makers:  a 5 cup and a 5 pint.  I have tried more recipes than I care to admit with little or no success.  Inevitably every recipe came out too runny for my palate.  I accepted defeat and stored the yogurt makers where I did not have to face them again.

My vintage yogurt maker

I found this yogurt maker at Goodwill for $10 dollars. Mason jars can be used in conjunction with your oven if you don’t want to invest in another appliance.

That was my history with yogurt; until last week….It changed when I watched a yogurt-making segment on the “Live Healthy” TV channel.  I found myself lured once again into making yogurt at

home.  This recipe heated the milk to a higher temperature than other recipes I had tried, and that higher temperature made all the difference.  The results are AMAZING!   So amazing I want to share the joy and the know-how  with my blog readers.

Yogurt Making Equipment

A yogurt maker is wonderful, and Salton yogurt makers can occasionally be found at thrift stores for a small price.  As long as you find a working base and cover, you can successfully replace jars and lids, or make due with substitutes.  Ebay had several jars and lids available at last check.  There are newer models available that probably make life easier, but I choose to use my old makers and reduce my appliance inventory.

If you don’t have a yogurt maker, pint size mason jars can be used as culture jars using the oven.  Preheat oven to 250 degrees.  Set mason jars on a tray on the middle shelf and turn off the oven.  Jars will need to culture for 6-8 hour, so remember not to open the oven during this time.

You will need a reliable and accurate thermometer.  Digital readout is  probably the easiest way to  determine temperature, but I have a candy thermometer that works just fine.

Use jars sterilized in the dishwasher or dip in boiling water for a few minutes to kill any bacteria and yeast that may be on the jar.  If using mason jars, sterilize lids too.

The Yogurt Recipe

  • 1/2 gallon milk of your choice:  whole, 2%, skim, lowfat, cow, goat, etc.
  • *3 TBLSP commercial live yogurt culture ( plain) from the grocery
  • 2 TBLSP milk
  • * Save a jar of your home-made yogurt to use as the starter for the next batch.  When the texture of the yogurt thins, use commercial yogurt product to restore the integrity of the culture.

Directions

Pour 1/2 gallon of milk (minus the 2 Tablespoons) into a large pot and heat at med to low heat until the milk reaches 185 degrees F. Stir frequently to prevent scorching the milk.

  • This temp is the key to getting a good set on the yogurt.  The temperature is higher than regular milk pasteurization temps (165 degrees F) so it ultra-pasteurizes the milk killing off bacteria and yeast.

Once the milk reaches the correct temperature turn off the heat and remove from burner.  Monitor temperature regularly.  When milk drops to 110-115 degrees F it is ready to introduce the culture.

Mix 3 Tblsp of yogurt culture with 2 Tblsp of milk and mix until smooth.

Add culture mixture to milk and stir until thoroughly mixed.  Pour into jars, top with lids and incubate 6-8 hours until firm.

Once firm, place yogurt in the refrigerator until ready for use.

Replacement Lids and Jars can be found on the internet

If you don’t have the jar lid, plastic wrap or Press’n'seal can be used to cover the jars in the refrigerator.

Uses for Yogurt

Did you know  yogurt makes a great facial mask?  Add a Tblsp of honey and mix.  Apply to face making sure to avoid the eyes.  Wash off with cool water after 15-20 minutes.

Yogurt can be used as a substitute for sour cream in most recipes and if you use lowfat or skill milk, you will save several calories.

Add fresh fruit to a serving of yogurt and top with granola or toasted coconut for a continental breakfast.  A dollop of honey adds sweetness and a sprinkling of spices such as cinnamon, ground coriander, nutmeg, allspice or mace add a distinctive and fresh flavor.

Yogurt is well recognized as a healthy food for the intestinal tract.  The “good” bacteria found in yogurt cultures help maintain a healthy presence of bacteria when eaten regularly.  Probiotics (bacterial cultures found in the healthy intestinal tract) are beneficial especially after intestinal illness or while taking antibiotics to restore the balance of bacteria necessary for proper food digestion.

I hope you will consider making your own yogurt at home using this simple recipe and enjoy life’s simple pleasures!

Posted in DIY, Health, Life's Simple Pleasures, Recipe, Uncategorized | Tagged , , , , , , , , , , , , , | Leave a comment

In All It’s Glory!

Chimera

chimera |kīˈmi(ə)rə, kə-|(also chimaera )  Biology: an organism containing a mixture of genetically different tissues, formed by processes such as fusion of early embryos, grafting, or mutation: the sheeplike goat chimera.

The drought has been challenging this year but one should always look for the positive.  We hardly mowed the yard at all this year!  We also have found several chimeras in the zinnia patch.  What is a chimera?  A chimera is made up of different genetic material in one being.  My husband says he found chimeras in the apple orchard all the time.  Rarely you’ll find a really special one in some way and if your lucky, you reproduce it, patent it and become rich.

I don’t think I’ll gain any monetary compensation for this beautiful flower found in my garden, but the pleasure it gives me is beyond measure!  I love the symmetry between the solid and the peppermint.  The yellow stamen are so unexpected and perfect.  I’m sure this flower is reverting to the parents that bred it because of the stress caused by drought and extreme heat this summer.  The flower is a peppermint variety and should look like the right side all over…and yet it really catches my attention.  I love it.

zinnias

A bouquet fresh from the garden. Zinnias are so colorful and come in a variety of colors and shapes. These are from the Benery Giant collection from Harris Seeds.

When life gives you lemons, make lemonade….This lovely flower did just that, and is the better for it.  It stands out from all the other flowers in the vase.  Sometimes life seems a bit overwhelming and it is so easy to fixate on the negative. Remember that adversity makes us strong and helps us to become more than we were……..it gives us a chance to grow, change, and yes….evolve!

Please take time to enjoy the simple pleasures that touch your life every day, even in the face of challenge.


Posted in gardening, Life's Simple Pleasures, Seasonal | Tagged , , , , , , , , , , , , , | 12 Comments